Friday, 7 August 2015

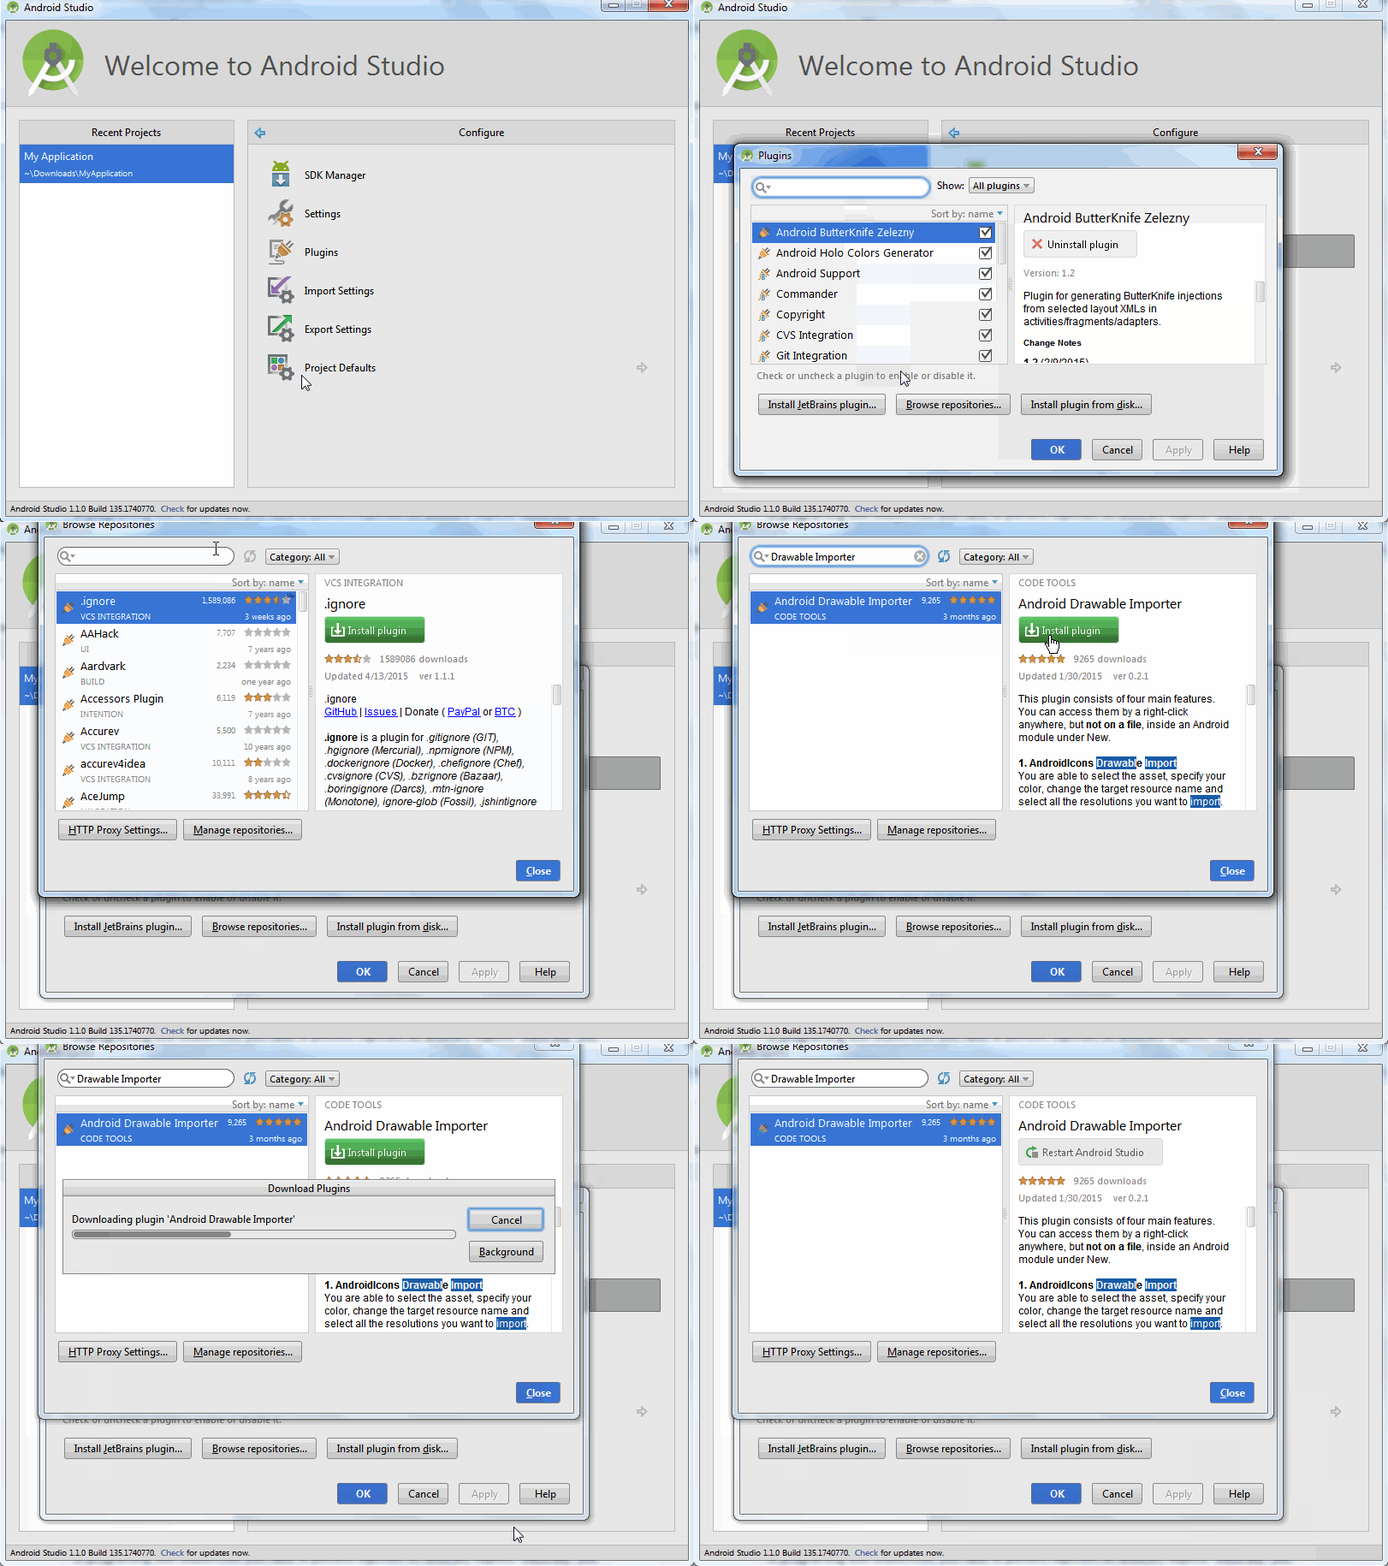
How To install Drawable Importer:


Drawable add
Import Drawables
To adapt to all Android screen sizes and densities, each Android project contains the drawable folder. Any developer with experience of Android development knows that to support all the screen sizes you must import different drawables for each screen type. The Android Drawable Importer makes this job easier. It reduces the effort needed to import scaled images into the Android project. Android Drawable Importer adds an option to import drawables in different resolutions or scale a specified image to a defined resolution. This plugin speeds up every developer's work with drawables.

To install Drawable Importer:

Install Drawable Importer

Android Drawable Importer For creating drawable for all screen resolution


Vendor: Marc Prengemann
License: LICENSE
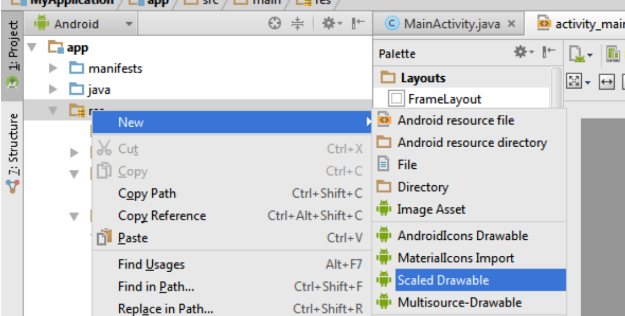
This plugin consists of four main features. You can access them by a right-click anywhere, but not on a file, inside an Android module under New. 

1. AndroidIcons Drawable Import 
You are able to select the asset, specify your color, change the target resource name and select all the resolutions you want to import. 
All the missing folders will be created automatically. If there are already drawables with the same name, you will be warned. 

2. Material Icons Drawable Import 
This feature offers basically the same like the AndroidIcons import. You are able to select the asset by category, specify the color, change the target resource name and select all the resolutions you want to import. 

3. Scaled Drawable 
Select at least one asset and specify the resolution of it. If you want to scale the to be imported image as well, you should select "other" and then fill out the "target resolution" and the "target width / height". Then you can specify all the resolutions, to which the drawable should be resized to. 
This works also with 9-Patch-Images. But take care: sometimes it's necessary to remove / add about one "pixel" in the 9-Patch-Editor. But just try it :) 

4. Multisource-Drawable 
Ever got a zip with drawables for your Android project by your designer with the following structure? 

root/ 
./drawable_ldpi.png 
./drawable_mdpi.png 
./drawable_hdpi.png 
./drawable_xhdpi.png 

No problem! Now you can just select for every resolution a different asset, specify one name for them, and the rest is done by the plugin. 

Hint: When you select an asset, you can also just drag a file from your finder / explorer to the text field and drop it there.
Downloads: 23107
Rating:
Participated in rating: 3
VersionCompatible buildsDate
0.2.1123.7230.01.2015Download
3 updates are hidden show all updates
Screenshot #14925
Screenshot #14931
Screenshot #14926
Screenshot #14922
Screenshot #14930

Supporting Multiple Screens


To simplify the way that you design your user interfaces for multiple screens, Android divides the range of actual screen sizes and densities into:
  • A set of four generalized sizessmallnormallarge, and xlarge
    Note: Beginning with Android 3.2 (API level 13), these size groups are deprecated in favor of a new technique for managing screen sizes based on the available screen width. If you're developing for Android 3.2 and greater, see Declaring Tablet Layouts for Android 3.2 for more information.
  • A set of six generalized densities:
    • ldpi (low) ~120dpi
    • mdpi (medium) ~160dpi
    • hdpi (high) ~240dpi
    • xhdpi (extra-high) ~320dpi
    • xxhdpi (extra-extra-high) ~480dpi
    • xxxhdpi (extra-extra-extra-high) ~640dpi
To create alternative bitmap drawables for different densities, you should follow the 3:4:6:8:12:16 scaling ratiobetween the six generalized densities. For example, if you have a bitmap drawable that's 48x48 pixels for medium-density screens, all the different sizes should be:
  • 36x36 (0.75x) for low-density
  • 48x48 (1.0x baseline) for medium-density
  • 72x72 (1.5x) for high-density
  • 96x96 (2.0x) for extra-high-density
  • 180x180 (3.0x) for extra-extra-high-density
  • 192x192 (4.0x) for extra-extra-extra-high-density (launcher icon only; see note above)

How to import eclipse project in android studio

1.Update your Eclipse ADT Plugin (you must have version 22.0 or higher).
2.In Eclipse, select File > Export.
3.In the window that appears, open Android and select Generate Gradle build files.
4.Select the projects you want to export for Android Studio and click Finish.
Your selected projects remain in the same location but now contain a build.gradle file and are ready for Android Studio.
Import into Android Studio
1.In Android Studio, select File > Import Project.
2.Locate a project you exported from Eclipse, select the project's root directory and click OK.
3.Select Create project from existing sources and click Next.
4.Follow the walk-through to complete the import process.

Wednesday, 29 July 2015

Building Your First App

Welcome to Android application development!
This class teaches you how to build your first Android app. You’ll learn how to create an Android project and run a debuggable version of the app. You'll also learn some fundamentals of Android app design, including how to build a simple user interface and handle user input..
Hello Android Example
You need to follow the 3 steps mentioned above for creating the Hello android application.

1) Create the New Android project

For creating the new android project:

1) Select File > New > Project...
2) Select the android project and click next

3) Fill the Details in this dialog box and click finish

Now an android project have been created. You can explore the android project and see the simple program, it looks like this:

Main Activity :

package com.example.helloworld;

import android.os.Bundle;
import android.app.Activity;
import android.view.Menu;
import android.view.MenuItem;
import android.support.v4.app.NavUtils;

public class MainActivity extends Activity {

   @Override
   public void onCreate(Bundle savedInstanceState) {
      super.onCreate(savedInstanceState);
      setContentView(R.layout.activity_main);
   }
   
   @Override
   public boolean onCreateOptionsMenu(Menu menu) {
      getMenuInflater().inflate(R.menu.activity_main, menu);
      return true;
   }
}

Manifest.xml File :
<manifest xmlns:android="http://schemas.android.com/apk/res/android"
   package="com.example.helloworld"
   android:versionCode="1"
   android:versionName="1.0" >
   
   <uses-sdk
      android:minSdkVersion="8"
      android:targetSdkVersion="22" />
   
   <application
       android:icon="@drawable/ic_launcher"
       android:label="@string/app_name"
       android:theme="@style/AppTheme" >
       
       <activity
          android:name=".MainActivity"
          android:label="@string/title_activity_main" >
       
          <intent-filter>
             <action android:name="android.intent.action.MAIN" />
             <category android:name="android.intent.category.LAUNCHER"/>
          </intent-filter>
       
       </activity>
       
   </application>
</manifest>
Run The Application:
To run the android application: Right click on your project > Run As.. > Android Application
The android emulator might take 2 or 3 minutes to boot. So please have patience. After booting the emulator, the eclipse plugin installs the application and launches the activity. You will see something like this:


Saturday, 21 February 2015

First Step To Learn Android

Hello everyone,

As you all know that Android is the very popular operating system and used by most of the people in the world.If you want to be Software developer then it's a good time to learn Android Technology.

To learn Android,you need a very basic understanding of JAVA language.JAVA is a open source and platform independent language.Open source means all the development tool (JDK Java Development tool) are freely available for each operating system like Windows,linex,MAC etc.

Before staring learning JAVA you need  understanding of  programming logic's from c and c++ language.


Android is a Operating System based on linex carnal for handheld devices like Smart Phone.Today many mobile company uses Android Operating System in there Mobile devices.Currently most of the company launches there smart phone based on Android Operating System.

For Developer Point of View

Android is open source,we uses Java language for application development.To become a Android application developer you need a basic knowledge of core java like 
  1. All Opps concept :Polymorphism ,Inheritance,Encapsulation,Object,Class.
  2. Thread
  3. Synchronization
  4. Interface
  5. String
  6. Data Types
  7. Collections
Development Environment :


 You will be glad to know that you can start your Android application development on either of the following operating systems:
  • Microsoft Windows XP or later version.
  • Mac OS X 10.5.8 or later version with Intel chip.
  • Linux including GNU C Library 2.7 or later.
Second point is that all the required tools to develop Android applications are freely available and can be downloaded from the Web. Following is the list of software's you will need before you start your Android application programming.
  • Java JDK5 or JDK6
  • Android SDK
  • Eclipse IDE for Java Developers (optional)
  • Android Development Tools (ADT) Eclipse Plugin (optional)

Step1 - Setup Java Development Kit (JDK) :


You can download the latest version of Java JDK from Oracle's Java site: Java SE Downloads.To set java path you go to following options...

Start->Control Panel->Performance and Maintenance->System->Advance->Environment Variable 

  1. Now Click on new
  2. Set Variable name as PATH
  3. Set Variable value as you JDK Path followed by bin directory
  4. Now click on Ok option.

Now create another Environment Variable :
  1. Now Click on new
  2. Set Variable name as JAVA_HOME
  3. Set Variable value as your JDK Path.
  4. Now click on Ok option.
If you are running Windows and installed the JDK in C:\jdk1.6.0_15, you would have to put the following line in your C:\autoexec.bat file OR follow upper steps..

set PATH=C:\jdk1.6.0_15\bin;%PATH%
set JAVA_HOME=C:\jdk1.6.0_15

On Linux, if the SDK is installed in /usr/local/jdk1.6.0_15 and you use the C shell, you would put the following code into your .cshrc file.

setenv PATH /usr/local/jdk1.6.0_15/bin:$PATH
setenv JAVA_HOME /usr/local/jdk1.6.0_15


Check your System Java path is set or Not :
  1. Go to command Prompt by CMD
  2. Type JAVAC and Press Enter :if you see message "JAVAC is not an internal OR external command" means you java path is not set.
  3. If this messages are appear means your java path is set successfully.
  4.  

Step 2 - Setup Android SDK :

You can download the latest version of Android SDK from Android official website : Android SDK Downloads

Step 3 - Setup Eclipse IDE :

To install Eclipse IDE, download the latest Eclipse binaries from http://www.eclipse.org/downloads/
After download compete unzip the file and copy it to any where you want in your system.

Eclipse can be started by executing the following commands on windows machine, or you can simply double click on eclipse.exe or right click on eclipse.exe and create an Shortcut on desktop for easy of use.


Step 3 - Create Android Virtual  Device :

To test your Android applications you will need a virtual Android device. So before we start writing our code, let us create an Android virtual device. Launch Android AVD Manager using Eclipse menu options Window > AVD Manager> which will launch Android AVD Manager. Use New button to create a new Android Virtual Device and enter the following information, before clicking Create AVD button.